SLIDER

summer pudding - xmas week 2019

23 Dec 2019


Welcome to the final post for Xmas week 2019. I had my first taste of summer pudding many moons ago, whilst in London. My sister and I had dinner at a local french restaurant and we ordered the set menu. One of the dessert choices was summer pudding which I ordered and I've been a fan ever since.


If you're not a fan of Christmas pudding this sets the tone for Christmas and you can enjoy all the summer berries available in the shops. In some ways, we're pretty lucky that Christmas falls in summer.


I wouldn't call making a summer pudding 'cooking' as its more an assemblage. You need to plan ahead though as the pudding needs to be put together the day before serving. The end result depends on the quality of the ingredients used - a sturdy loaf of white bread and the freshest berries you can find. You can certainly use some frozen berries, but you mainly need fresh berries or else the pudding will be so mushy you won't be able to cut a neat slice. I used 100g frozen raspberries and 60g of frozen blackberries in the mixture, saving the fresh berries for the topping. 


Here’s the recipe for you which needs to be made the day before serving. For all my recipes I use a 250ml cup and a 20 ml tablespoon. You will need a pudding basin or large bowl (I used a Mason Cash white pudding basin) to make this recipe or you could use a loaf tin.


Summer pudding
250g strawberries
125g blueberries
125g blackberries
250g raspberries
125g redcurrants (if unavailable make up with another berry)
1 vanilla bean
½ -⅔ cup caster sugar 
1-2 tbs water
1 day old white loaf, crusts removed, cut into 1 cm slices. You’ll need about 8 slices.
Butter for greasing
To decorate - mixed berries
To serve - 200 gm double cream

Method
Hull the strawberries and halve or quarter if large. If using red currants remove the currants from their stems by using the tines of a fork.  Rinse the berries in cold water, removing any damaged berries.

Put the berries into a large saucepan with ½ cup sugar, vanilla bean and water then place over a medium heat for about 3-4 minutes to allow the sugar to dissolve and the juices to run a little from the berries. Remove the pan from the heat. It’s important not to cook the berries too much or they will become too mushy. Allow the mixture to cool; discard the vanilla bean then strain the mixture through a fine sieve to separate the fruit from the berry juices. Test the berries for sweetness and add a little more sugar to taste. 

Lightly grease a pudding basin and line the bowl with 2 large pieces of cling film allowing some overhang. From one bread slice, cut out a round large enough to fit pudding bowl base and place in the bowl. Cut 4 bread slices in half diagonally to form triangles and cut 4 slices in half vertically to form rectangles. Lay the sliced bread around the sides overlapping a little, press the bread into the sides of the bowl with your hands so you really make a seal. Patch any gaps with pieces of bread.

Once the mould is lined with bread, spoon the cooled berries into centre and press gently down to level, then spoon half the berry liquid over, reserving the remaining liquid. You can trim any excess bread with a pair of kitchen scissors at this stage. Completely cover the top of the pudding with more pieces of bread, then fold the plastic wrap over to seal the pudding and rest a plate that fits directly on the bread (inside the bowl) and place a weight on top to compress the pudding. Place in the fridge for about twenty-four hours. 


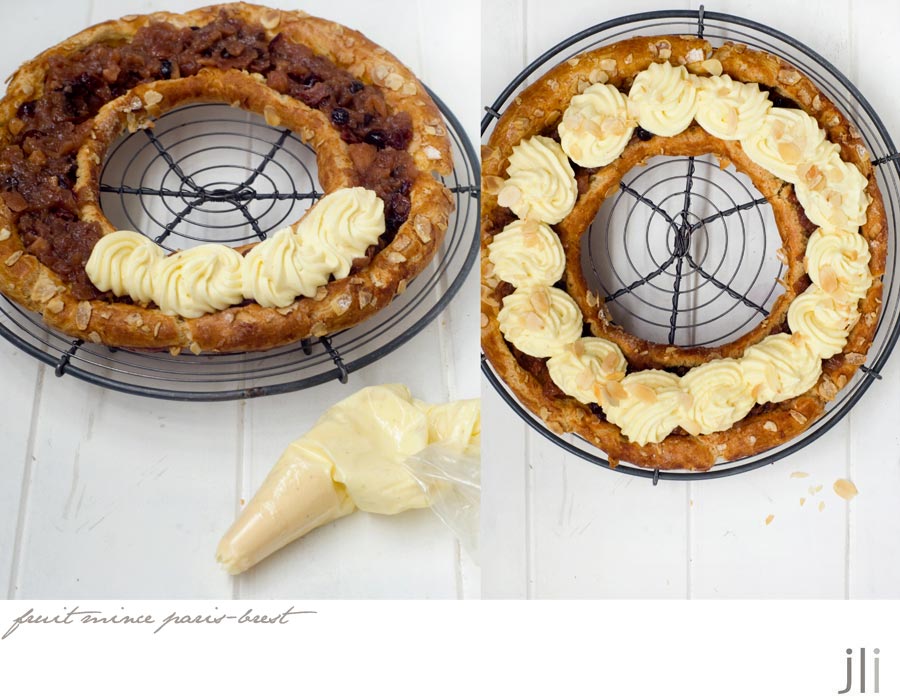
When ready to serve, uncover the top of the pudding then turn the pudding out onto a serving plate, removing the cling film. Use a pastry brush to soak any bits of bread that still look white with some of the reserved juice. Top with the extra berries and some of the reserved syrup. Cut the pudding into slices and serve with the cream. I had some left over crème madame from the fruit mince Paris-Brest and served it with my slice of pudding and it was so delicious.

Well that was the last post for Xmas Week 2019 and my last post for the year. I'm taking 4 weeks leave so I'm not sure when I'll be posting again. Until I do, wishing you the happiest of holidays and see you all again in 2020.

Bye for now,

Jillian

PRINT RECIPE

fruit mince paris-brest - xmas week 2019

20 Dec 2019


Welcome to day 5 of Xmas Week 2019. Today I have another show stopper for the Christmas table, this time a fruit mince Paris-Brest. Paris-Brest's have flooded instagram this year and I thought I'd join the party. The Paris Brest was first made in 1910 to celebrate the inaugural Paris to Brest cycle race and the shape of the pastry represents the wheel of a bike. It's a classic made from choux pastry filled with praline flavoured crème pâtissière and topped with nuts. 


I just happened to have a jar of Flour and Stone rhubarb and apple fruit mince in my fridge and wondered if I could use it to flavour my Paris-Brest filling instead of using praline. You could use a cup of your own favourite home made fruit mince but I wouldn't try this recipe with shop bought fruit mince. If you don't like fruit mince you could use some fresh berries or a cup of your favourite stewed fruit. 


I'm not going to lie, the recipe and the list of ingredients looks a little daunting but if you take things step by step, you'll be okay. Much of the Paris-Brest can be made in advance, including the choux rings. The fruit mince can be made up to 3 weeks ahead, whilst the crème pâtissière can be made the day before serving leaving the choux the only component that needs to be made just before baking. Once baked you can store it a day or two in an airtight container then refresh it before serving by placing the 2 halves on oven trays and reheating them for 10 - 15 minutes in an oven preheated to 180°C. Once cool, you can assemble the Paris-Brest just before serving. It can hold for a few hours but it's best served on the day.


Here's the recipe for you which makes one Paris-Brest. For all my recipes I use a 250 ml cup and a 20 ml tablespoon. All eggs are 60 grams and my oven is a conventional gas oven not fan forced, so you may need to reduce your oven temperature by 20°C.


Fruit Mince Paris Brest adapted from an Anneke Manning recipe
1 quantity basic choux pastry
25 g (¼ cup) flaked almonds
icing sugar, to dust
1 cup fruit mince

Flour and stone rhubarb and apple fruit mince 
5 rhubarb stalks, leaves removed
3 granny smith apples
50g raisins
50g currants
50g finely chopped mixed peel
50g sultanas
50g cranberries
1 knob stem ginger finely diced
½ tsp ground cinnamon
¼ tsp ground nutmeg
⅛ tsp ground cloves
⅛ tsp ground allspice
100g brown sugar
1 tsp vanilla extract

Crème pâtissière
125 ml (½ cup) milk
125 ml (½ cup) pouring cream
1 vanilla bean, split lengthways and seeds scraped
3 egg yolks
55 g (¼ cup) caster sugar
2 tbs plain flour
125 ml (½ cup) thickened cream, whipped to firm peaks

Choux pastry
150 g (1 cup) plain flour
185 ml (¾ cup) water
½ tsp salt
75 g butter, diced
3 eggs, plus 1 extra egg

Fruit mince
Slice the rhubarb stalks in half lengthways, then cut into 2cm lengths. Wash the rhubarb well and set to one side. Peel and core the apples, then coarsely chop in the bowl of a food processor or cut into 1cm dice. Set next to the rhubarb. In a separate bowl combine the dried fruit, ginger and spices.

To cook the fruit mince, choose a saucepan with a large base like you would use for making jam – this will ensure the rhubarb cooks quickly and retains its bright pink colour. Briefly heat the saucepan over medium heat before tossing in the rhubarb, then add the brown sugar and vanilla and stir quickly to combine the fruit with the sugar. Continue to cook the rhubarb over medium heat for 5 minutes or until it starts to soften then add the apple to the pan. The juices will release from the apple and the mixture will become more liquid so just keep stirring occasionally so the mixture doesn’t catch and burn. Cook the apple for 5 minutes then add the dried fruit mixture and cook for a further 15 minutes until the fruit is plump and the rhubarb and apple have formed a lovely jammy texture. Remove the pan from the heat and leave the fruit mince to cool in the pan, then store in the fridge until you’re ready to make the paris brest. The mince will keep for 3 weeks refrigerated. If you want to keep it for longer you can always sterilise jars and fill them with the fruit mince to preserve it. You’ll about 1 cup of the fruit mince for this recipe.

Crème Patissiere
Put the milk, cream and vanilla seeds and bean into a medium saucepan. Bring just to a simmer over a medium heat. Remove from heat and remove the vanilla bean. Use a balloon whisk to whisk the egg yolks, sugar and flour together in a heatproof bowl until well combined. Gradually whisk in the milk mixture until smooth and well combined. Return to the heat and stir constantly with the whisk over medium heat until the mixture comes to a simmer. Simmer, stirring constantly with the whisk, for 2 minutes or until thick. Remove from the heat and transfer into a heatproof bowl. Cover the surface with plastic wrap and refrigerate for 1 hour or until well chilled. Fold the whipped cream through the crème pâtissière. Test for sweetness and adjust if necessary. Cover and return to the fridge to chill.

Choux Pastry
Preheat the oven to 200°C. Draw a circle on a piece of baking paper using an 18 cm cake tin as a guide. Turn the paper marked side down and use to line a large baking tray with non-stick baking paper.

Sift the flour onto a sheet of baking paper. Combine the water, salt and butter in a medium saucepan and heat over medium heat until just boiling. Remove immediately from the heat, add all the flour at once and stir vigorously with a wooden spoon to combine.

Return the saucepan to the heat and beat vigorously over a low heat for 30 seconds or until the mixture is smooth and starts to pull away from the sides of the pan and a flour film forms on the bottom of the pan. Remove the saucepan from the heat and set aside for 3-5 minutes or until cooled slightly.

Use a fork to whisk together the 3 eggs. Add about one-quarter of the whisked eggs to the flour mixture at a time beating well with the wooden spoon until well combined and smooth after each addition. Use a fork to lightly whisk the extra egg and gradually add to the flour mixture a teaspoon at a time and beating well after each addition until the mixture is thick, shiny and falls heavily from the spoon. You may not need to use all of the last egg. Don’t discard it as you can use this to glaze the choux ring.

Piping the choux pastry
Spoon the warm choux pastry into a large piping bag fitted with a 1.5 cm nozzle. Sprinkle a little water on the lined baking tray. Pipe the choux pastry on the tray using the circle as a guide. Use a wet fingertip to gently seal the two ends. Pipe a second circle on the inside of the first so they are just touching but not overlapping, and sealing the ends as before. Lastly pipe a third circle where the first two join and on top of them, sealing the ends. Use wet fingers to gently smooth the joins of the three rings together. Brush any remaining egg over the choux bun. Sprinkle the flaked almonds over the top of the choux then just before baking sprinkle the icing sugar over the almonds.


Baking
Bake in preheated oven for 20 minutes. Reduce oven temperature to 180°C and bake for a further 20-30 minutes or until golden, puffed and crisp. Split choux pastry ring in half horizontally with a sharp serrated knife and place the two halves separately back on the tray and return to oven for 10 minutes or until dry. Transfer to a wire rack to cool completely (this will take about 30 minutes).

To serve
Place the bottom half of the choux ring on a serving plate. Spoon the fruit mince into the hollow of the choux ring then decoratively pipe the crème pâtissière over the fruit mince, before covering with the top of the choux ring. I had some leftover toasted almond flakes so I sprinkled them over the crème pâtissière filling. Liberally dust the top of the Paris-Brest with icing sugar and serve.


That was going to be my last post for Christmas week but I went a bit overboard and have another dessert to share with you on Monday.

So until then,

bye for now,

Jillian


PRINT RECIPE

polka dot cheesecake - xmas week 2019

19 Dec 2019


Welcome to Day 4 of Xmas Week 2019. A few months ago Zoebakes blog featured a bull's eye cheesecake adapted from a Maida Heatter recipe. Maida Heatter was a well known American cookbook author who recently passed away at the grand old age of 102. As cheesecake is always a popular dessert at Christmas, I thought I'd like to give it a try and whilst searching for recipes on the net, I found a recipe for a polka dot cheesecake.


I couldn't resist the temptation and gussied it up a bit with a chocolate shortbread base and an espresso flavoured chocolate ganache.


Yes, I won't deny making this cheesecake is a bit of a fiddle but the end result was absolutely spectacular - a crunchy chocolate flavoured base; a smooth as silk filling and the slightly bitter note from the ganache topping. The cheesecake needs plenty of cooling time though, so you'll have to start making the cheesecake the day before you plan to serve it.


Here's the recipe. For all my recipes I use a 250 ml cup and a 20 ml tablespoon. All eggs are 60 grams and my oven is a conventional gas oven not fan forced, so you may need to reduce your oven temperature by 20°C. If you'd like to make a larger version refer to the original recipe in the link for the filling quantities. If you make the cheesecake in an 8 inch tin, then increase everything by 50%. If making a 9 inch cheesecake then you'll need to double  the quantities.

Polka Dot Cheesecake inspired by a Maida Heatter recipe 
Base 
55 grams unsalted butter 
1 tbs caster sugar 
½ tsp vanilla
½ cup plain flour  
1½ tbs cocoa
Pinch salt

Filling
500g cream cheese
1-tbs yoghurt or sour cream
1 teaspoon vanilla extract 
2 large eggs
½ cup caster sugar
30g dark chocolate, melted
1 tsp cocoa powder, sifted

Topping
50mls cream
¼ tsp espresso powder
50g dark chocolate, finely chopped

Method
Preheat oven to 180°C, butter a 17cm-diameter spring form cake tin and line the base with baking paper. Cream the butter, sugar and vanilla together until light and creamy. Sift the flour with the cocoa and salt into a small bowl. Add to the butter mixture and combine until the mixture forms a soft dough. Press the mixture into the base of the greased spring-form tin, bringing it slightly up the sides. Bake 15 minutes or until the base is dry, then cool to room temperature. Once cool, wrap 2 layers of plastic wrap around the base and sides of the tin followed by 2 layers of foil and tie it firmly with a piece of kitchen string (this prevents water seeping into the pan while cooking in the water bath). Otherwise line the base and sides of a regular 17cm tin with baking paper leaving a few cms overhang to use as a handle to remove the cheesecake from the tin.

Filling
Lower the oven temperature to 160°C. In a food processor, combine the cheese, sour cream or yoghurt and vanilla extract. Process until the mixture is smooth before continuing. Add the eggs, one at a time. Remove ½ cup of the cheesecake mixture and place in a small bowl. Add the melted chocolate and sifted cocoa powder and beat until smooth. Place in the fridge until needed.

Regrease the sides of the springform pan then pour in the light-coloured mixture. Fit a large pastry bag with a plain 1cm tube. Place the chocolate mixture in the bag. Place the tip of the tube in the centre of the top of the cake, inserting it about 1 cm into the cake. Squeeze out enough of the chocolate mixture to form a perfectly round ball about 1'' wide. There will now be a dark polka dot in the centre of the cake. Then, using the same procedure, squeeze out 6 smaller balls around the rim spacing them evenly. The balls around the rim should be smaller than the one in the centre, and they should not touch each other or the centre ball. If you have some chocolate mixture left over, add it to the centre ball; if you still have some left over, add a bit to each of the other balls.

The top of the cake will not be smooth and level now, but it will level itself during baking. Place the cheesecake into a roasting pan and pour boiling water into the roasting pan to come halfway up the sides of the spring-form pan. Bake in the oven for about 1 hour. The cake will still have a slight wobble. Turn the oven off and leave in the oven for about 1 hour to cool. I removed the cake from the water bath after 30 minutes when it was cool enough to remove the foil and plastic wrap and placed it back in the oven for another 30 minutes. Place the cheesecake on a rack and when completely cold, refrigerate overnight. The next day make the topping.


Topping
In a small saucepan, heat the cream to boiling point. Stir in the espresso powder and mix until it dissolves. Place the chopped chocolate in a small bowl, then pour the hot cream over the chocolate and allow to stand for a few moments until the chocolate starts to melt. Stir the chocolate until its smooth then put ganache to one side to thicken a little. Reattach the spring-form ring to the base and pour the chocolate ganache over the top of the cheesecake.  Gently smooth with a spatula then gently tap the cheesecake to level the topping. Allow the topping to completely set then run a knife around the cake before unmoulding. Keep refrigerated until ready to cut and serve. 


This looks so impressive when cut, so expect to hear lots of oohas and aahs.

See you all tomorrow with another showstopper for your Christmas table.

Bye for now,

Jillian

PRINT RECIPE

browned butter fruit tarts - xmas week 2019

18 Dec 2019


Welcome to Day 3 of Xmas Week 2019. You may remember I made a mixed berry brown butter tart a few months ago. I wasn't happy with it at all so I went back to the drawing board and completely reworked the filing with much better results. I decided to make some individual tarts but for Christmas Day you could make one large tart to share. Wanting to give people choice I used some chopped rhubarb and a selection of berries to top the tarts. The rhubarb browned butter tart was particularly delicious.


I also made a test tart without pre-baking the pastry shell. It took 5 – 7 minutes longer to cook and the pastry was a little less golden but other wise it turned out very well. Anything that saves time in the kitchen is a good thing isn't it?


Here's the recipe for you which makes nine 6 cm tarts or one 23 cm tart. For all my recipes I use a 250 ml cup and a 20 ml tablespoon. All eggs are 60 grams and my oven is a conventional gas oven not fan forced, so you may need to reduce your oven temperature by 20°C.


Brown butter fruit tarts 
Crust
150g unsalted butter
⅓ cup caster sugar
1 tsp vanilla extract
1½ cups plain flour
Pinch of salt

Filling
75g unsalted butter, diced
90g caster sugar
½ teaspoon vanilla extract
1 large egg
pinch salt
½ cup plain flour
½ tsp baking powder
2 punnets ripe berries and 3 rhubarb stalks, sliced into small lengths

Optional 
1 tbs warmed apricot jam

Crust
Place all the crust ingredients into the bowl of a food processor. Whiz until a soft dough forms around the blade. Place the greased tart tins onto a baking tray. Roll the dough out thinly between 2 sheets of baking paper. Using one tart tin as a template cut out 9 small rounds placing one into the bottom of each of the tart forms. Re-roll the scraps and cut into lengths to form the sides of the tart shells. Press the dough evenly onto sides and bottom of the tins before placing in the fridge for 30 minutes. You may have a little bit of dough left over.

Meanwhile pre-heat the oven to 190ºC. Bake tart shells until golden, about 20 minutes (crust will puff slightly while baking). Transfer the tray to a rack and let the tart shells cool completely. This step can be done the day ahead with the tart shells stored in an airtight container. 

Filling
To make the browned butter, place the diced butter into a microwave safe bowl with a lid. Cook on high for about 5 minutes but start checking after 3 minutes. The butter will bubble madly but when ready will be darker in colour with some dark brown solids and should start to smell nutty. The butter will continue to darken while it’s cooling. Let the butter cool down to room temperature. You should have about 60g of brown butter. This step can also be done in advance, just remember to bring the butter back to room temperature before making the filling.

When the butter is cool, mix in the sugar and vanilla and beat until the colour lightens. Beat in the egg and mix thoroughly until incorporated. Sift the flour with the salt and baking powder into a small bowl. Mix the flour into the egg mixture and mix until well combined.

Spoon about 1 tablespoon of the brown butter mixture into the base of each of the cooled tart shells, about half full. Arrange the rhubarb slices decoratively over the filling and place the berries pointed side up and close together in concentric circles over the mixture. Return the filled shells to the baking sheet. Place the tray in the centre of the oven and baked for 30-35 minutes at 190ºC or until filling is puffed and golden. Cool tarts in pan on rack. While still warm, run a knife around the edge of the pastry to loosen from the tin, then remove tart pan sides when completely cool. If you like you can glaze the fruit with some warmed apricot jam.


They look pretty festive don't they, a little like Christmas baubles? 

See you all again tomorrow with some more baking for Xmas week 2019. 

Bye for now,

Jillian

PRINT RECIPE

peppermint candy cane brownies - xmas week 2019

17 Dec 2019


Welcome to Day 2 of Xmas Week 2019. Last year I saw a photo of some peppermint candy cane brownies and just knew I wanted to make a batch for this year's Xmas week. I made the brownie mixture, topped the mixture with crushed candy canes and while baking, the candy canes promptly melted in the oven resulting in a very unattractive looking mess. 


Undaunted I put on my thinking cap and worked on a way to get candy canes and peppermint flavouring into my brownies without making an unholy mess. In a stroke of genius I decided to make a peppermint flavoured chocolate ganache topping then topped the ganache with some chopped candy canes. 


I used dark mint chocolate I had in the cupboard, maybe it was Lindt, maybe it was from ALDI. I can't quite remember. If you don't have any mint chocolate you could always add some peppermint extract to the melted chocolate. Although I topped the brownies with a dark chocolate ganache, initially I was going to make a white chocolate topping. I thought a mint flavoured white chocolate ganache topped with crushed candy canes was such a great idea for Christmas brownies, I made a batch of those as well. 


I needed to make a double batch of white chocolate ganache to cover the brownies so if you make the white ganache version you'll need a 100 mls cream, 150g chopped white chocolate and 1 tsp of peppermint extract. I topped the ganache with crushed candy canes and added a sprinkle of sea salt flakes to balance out all that sweetness.


Here's the recipe for you which makes a 7 inch square tin of brownies. If you'd like to make a larger batch of brownies, increase everything by 50% and bake in an 8 inch square tin or double and bake in a 9 inch square tin. For all my recipes I use a 250 ml cup and a 20 ml tablespoon. All eggs are 60 grams and my oven is a conventional gas oven not fan forced, so you may need to reduce your oven temperature by 20°C. 

Peppermint candy cane brownies (inspired by a Claire Ptak recipe)
Ingredients
125g unsalted butter
135g 70% dark chocolate
¾ cup packed light brown sugar
2 eggs
1 tsp vanilla extract
⅓ cup plain flour
1½ tbs cocoa
pinch salt

Topping
50 mls cream
75g dark mint chocolate, finely chopped
4 candy canes, crushed

Preheat the oven to 190°C. Butter a 7 x 7-inch baking pan and line with parchment paper; allow 2 inches of overhang.

Melt the butter and the chocolate together in a bowl over simmering water or in the microwave.  Allow the chocolate butter mixture to cool to room temperature then stir in the brown sugar and the beaten eggs and the vanilla. Sift the flour and cocoa together with the salt. Add the flour mixture to the chocolate mixture and beat well until glossy. Spoon the mixture into the prepared tin.

Bake the brownies in the centre of the preheated oven for 25-30 minutes or until the edges are set and a toothpick inserted in the centre comes out with a few moist crumbs. Let the brownies cool in the pan before decorating.


Topping
In a small saucepan, heat the cream to boiling point. Place the chopped chocolate in a small bowl, then pour the hot cream over the chocolate and allow to stand for a few moments until the chocolate starts to melt. Add the peppermint extract at this stage if using and then put the ganache to one side to thicken. Spread the chocolate ganache over the cooled brownie and allow to partially set before sprinkling with the crushed candy canes. Allow the topping to set completely before cutting into squares to serve.


Brownies just the way I like them, all squidgy in the centre.

See you all again tomorrow with some more baking for Xmas week 2019.

Bye for now,

Jillian
PRINT RECIPE

raspberry white chocolate and pistachio pavlova - xmas week 2019

16 Dec 2019


Welcome to Christmas Week 2019. This year I've made a range of items including a few slightly more ambitious dessert items which you could serve for dessert on Christmas Day.


Recently I watched an episode of Bill's Kitchen - Notting Hill in which Bill whipped up some individual strawberry white chocolate and pistachio pavlovas. For Christmas Day I thought it would be nice to make a larger pavlova to share and as raspberries are in season I swapped them for the strawberries that were in the original recipe.


I always have trouble cooking meringue in my gas oven as the oven tends to go out at lower temperatures. Every time I checked the pavlova the oven had gone out and after an hour of baking, the pavlova was no-where near cooked. In the end I needed to switch the oven on three times and baked this pavlova for 2 hours before it was firm. It seemed to be worth the effort because the pavlova disappeared in the blink of an eye.


Here's the recipe for you which makes a 7 inch pavlova. For all my recipes I use a 250 ml cup and a 20 ml tablespoon. All eggs are 60 grams and my oven is a conventional gas oven not fan forced, so you may need to reduce your oven temperature by 20°C. 


Raspberry pistachio and white chocolate pavlova – inspired by a Bill Granger recipe
Serves 6
Ingredients
4 large egg-whites 
200g caster sugar 
1 tsp cornflour 
1 tsp white vinegar
1 tsp vanilla
100g white chocolate, roughly chopped 
80g pistachio nuts, roughly chopped

To decorate
150g fresh raspberries 
1 tbsp icing sugar  
300 ml cream
1 tsp vanilla extract  
A few mint leaves
A few chopped pistachios

Method
Preheat oven to 160°C. Line a baking sheet with parchment paper. Trace a 7 inch circle onto the paper with a pencil then turn the paper upside down. You’ll use this as template for the Pavlova.

Place the egg whites into the clean dry bowl of a stand mixer with a pinch of salt and whisk to soft, shiny peaks. Gradually add the sugar, a tablespoon at a time. Whisk well after each spoon full of sugar. Whisk until the mixture is really stiff and very shiny - the mixture should stand up in peaks once you lift out the whisk. Using a metal spoon, gently fold through the cornflour, vinegar and vanilla followed by the white chocolate and most of the pistachios, reserving a few for decoration. 

Once folded together, pile or pipe the meringue mixture onto the baking tray, keeping within the marked circle. Smooth the top so it resembles a flat cake. It needs to be at least 5-6 cm (2-3 inches) high to get a marshmallow interior. Make a small dip in the centre of the Pavlova.

Reduce the oven temperature to 140°C. Bake the Pavlova for 1½ hours or until lightly coloured and dry to the touch, then switch off the oven. Open the door to allow the meringue to cool down completely in the switched off oven. When cold, remove the Pavlova from the baking tray and store in an airtight container until ready to serve.


Serving
Mash 7 of the raspberries with the icing sugar until the berries have broken down (you can use frozen berries for this). Whip the cream until thick, add the vanilla extract then swirl through the crushed raspberries. Dollop the cream over the top of the Pavlova, top with the remaining berries and then add the remainder of the pistachios and the mint leaves.


This is a delicious confection and one worthy of serving on Christmas Day.

See you all again tomorrow with Day 2 of Xmas week 2019,

Bye for now,

Jillian
PRINT RECIPE

nectarine olive oil cake

9 Dec 2019


Nectarines have made their way into the fruit shop as have summer berries, watermelon and mangoes. I can't tell you how happy that makes me feel. With a bag of ripe nectarines in the fridge, I decided to make a nectarine version of Silvia Colloca's apricot cake.


This is a quick and easy to make cake. When I made the apricot cake I wrote a few notes in the margin of recipe book. Based on those notes I reduced both the quantity of sugar and milk in the cake batter and altered the method just a little. 


My olive oil was very fruity so I diluted it a little with some canola oil. As you can see even after reducing the quantity of milk, the batter was still very liquid.


Here's the recipe for you which makes an 8 inch square cake. For all my recipes I use a 250 ml cup and a 20 ml tablespoon. All eggs are 60 grams and my oven is a conventional gas oven not fan forced, so you may need to reduce your oven temperature by 20°C.


Nectarine and olive oil cake – makes 8 slices
Ingredients
3 large nectarines cut into eights
2/3 cup caster sugar, reserve 1 tbs
2 eggs, lightly beaten
finely grated zest of 1 lemon
1tsp vanilla extract
100 ml oil (I used a combination of extra virgin olive and canola oil)
1⅓ cups (200 g) self-raising flour   
½ tsp bicarbonate of soda
Pinch salt
⅓ cup milk
¼ cup flaked almonds, for sprinkling

Method
Preheat the oven to 180°C. Grease and line a 20 cm square tin with baking paper.

Sprinkle the sliced nectarines with the tbs of caster sugar and set to one side. In a medium bowl, using a balloon whisk combine the beaten eggs with the remaining sugar, lemon zest and vanilla extract. Slowly drizzle in the oil and whisk until well combined.

Sift the flour, the bicarbonate of soda and salt into a small bowl. Add to the egg mixture in batches alternating with the milk and whisk to form a smooth loose batter. Pour the batter into the prepared tin and arrange the nectarine slices on top any way you like. Sprinkle with the flaked almonds and bake for 45 minutes or until golden and a skewer inserted into the middle of the cake comes out clean. Cool in the tin for a few minutes, then turn out onto a wire rack and cool at room temperature for 1 hour before cutting into 8 slices.


I took the cake into work and it disappeared in a flash, which is always a good sign. When plums are in season I think I'll make another version using browned butter in the batter instead of olive oil. Watch this space.

I'll be back again next week with 5 offerings for Xmas week 2019. I hope you like what I've made for you.

Bye for now,

Jillian

PRINT RECIPE

white chocolate and raspberry cake

2 Dec 2019


Whenever I make my white chocolate raspberry brownies, they disappear in a flash so I tinkered with the recipe in an attempt to turn the brownies into a white chocolate raspberry cake. It should have been easy but I got a bit over confident and changed too many things. 


I reduced the amount of both the chocolate and the sugar; I swapped some of flour for almond meal and increased the quantity of berries. 


The cake was too moist and not quite sweet enough; the crumb was too open; the ganache wouldn't set and after looking through the images I discovered the raspberries I'd bought to decorate the cake were mouldy.


I returned to the kitchen and did what I should have done in the first place and this time it worked like a charm!


Here's the recipe for you which makes a 4 cup bundt cake or a 17cm round cake. For all my recipes I use a 250 ml cup, a 20 ml tablespoon, unsalted butter and 60g eggs. My oven is a conventional gas oven so if your oven is fan forced you may need to reduce the oven temperature by 20°C.


White chocolate and raspberry cake 
Ingredients
100 grams white chocolate, coarsely chopped
100 grams unsalted butter, chopped
2/3 cup caster sugar 
1 tsp vanilla 
2 eggs 
¾ cup SR flour
¼ cup Plain flour
Pinch salt
¼ cup milk
100g raspberries fresh or frozen

To decorate
75g white chocolate, roughly chopped
50 mls cream
¼ cup toasted flaked almonds
Few extra raspberries 
      
Method
Grease and flour a 4 cup bundt tin or 17cm round cake tin. Preheat oven to 180°C.

Melt white chocolate with the butter in an ovenproof bowl in the microwave. Leave to one side until cool. Add the sugar and vanilla and mix until well combined. Gradually add the eggs, beating until incorporated. Sift the flour with salt. Add the flour mixture in batches alternating with the milk until you have a soft batter. Gently fold through the raspberries then spread the batter in prepared pan. 
    
Bake in a 180°C oven for 45-50 minutes or till golden brown and a skewer comes out dry when tested. The bundt cake will take less time to cook than the round cake. Cool in the pan on a wire rack for about 10 minutes before unmoulding. When cool, drizzle the top of the cake with the white chocolate ganache. When the ganache has almost set, top with the raspberries and the flaked almonds.


White chocolate ganache
Place the chocolate in a heatproof bowl and bring the cream to the boil in a small saucepan. Pour the boiling cream over the chocolate and gently stir them together using a spatula until a shiny bubble-free ganache forms. Let cool a little to thicken before spooning over the cooled cake.


Serve as is or with a few extra berries on the side.


I'm making the last item for Christmas week this coming weekend. I can't wait to share everything with you starting Monday December 16.

See you all again next week witth some more baking from my kitchen.

Bye for now,

Jillian
PRINT RECIPE
© DELICIOUS BITES • Theme by Maira G.